Tuesday, May 22, 2007

Can't do it all

Wren's arrival complicated my gardening. Ironically, it was only after her February arrival was inevitable that I began to take a greater interest in gardening. Cris and I had always been interested in doing something with the yard but we hadn't had a chance to get to it, what with raising Lucas and buying (and refurbishing) the house. In the fall I realized I should start doing some prep-work and I did research throughout the winter. Then I started to get ideas and didn't want to see a whole year pass without prettying things up a bit.

I have to walk a delicate balance. I get bummed that I don't get more done on the yard, but I don't want to abandon the family to do it (besides, Cris gets grumpy if I don't help with the kids). So this past month I could either do stuff in the yard with my limited time, or I could blog about it. Your loss, I guess...

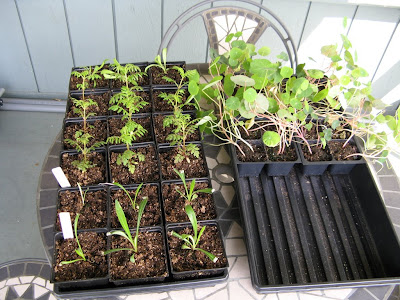
Progress has been made, though. Let me catch you up a bit. I managed to re-pot some seedlings into 3-inch pots. I really like the seedling trays and pots I bought from Charley's Greenhouse. The 10x20 inch trays hold 8 square seedling trays with 4, 6, or 9 seedlings per square. The seedling squares are interchangeable, so I don't have to commit to a full flat of the same-sized blocks. See this post for more details. 18 of the 3-inch square pots fit in the same 10x20 flat. Below you can see marigold, gazania, and felicia seedlings in the flat on the left and nasturtiums on the right. The nasturtiums got a bit leggy because I left them on the heating mat too long. I have two other kinds of nasturtiums anyway, so I gave them to Mary and planted phlox seeds ( Phlox drummondii 'Phlox of Sheep') in their stead.

In the fall I enlarged the garden borders into the yard by turning the sod over and covering it with several layers of newspaper and a bit of compost to hold down the paper. I completed the job this past month, putting down new newspaper and adding a cubic yard of topsoil and another of mulch. Thanks to the neighbors for the use of their pickup! Here's a pretty recent picture of the back yard. There's a tray of seedlings to be planted in the front...


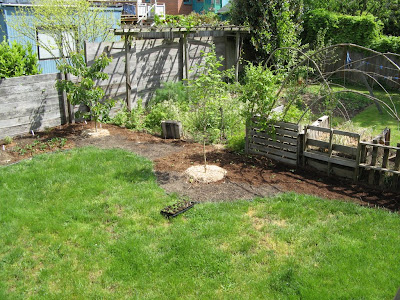
Compare that to this image from last summer:

There's the tree we planted last fall and the new beds on the eastern side of the yard. Looks a lot better now.

In addition to the flat of seedlings, I've also planted a few bulbs that were probably out of date and a bunch of seeds. Most of these should have been planted a month ago, so I hope they work out.

There are more details, of course. I'm not doing a very good job of conveying certain information in a timely manner. This is a bummer, because a major purpose for this blog was to help me keep track of when certain things were happening in the garden (e.g. blooming) so I would know for next year.

Here's Lucas helping Dada with the chipper-shredder.


Family is rewarding--sometimes the garden can wait.

More coming...

Sunday, April 8, 2007

Walt's Organic Fertilizer Co.

I have a hope that this blog will be useful to somebody. As such I'm going to try to include things I learn about seed starting and gardening as well as product and retailer reviews. Over time this may amount to a large number of posts and later readers might not want to have to read the entire history to discover something useful. The good people at Google have provided a helpful feature to deal with this problem: labels. At the bottom of each post you'll find any labels I've assigned to categorize the content. For instance, this post is labeled "retailer reviews." If you're interested in that sort of thing you should click on the label at the bottom of the post, or, if you're too lazy to scroll down, click here.

Intro completed. This post really concerns Walt's Organic Fertizer Company. Walt's is a small place about a block from the Ballard Bridge in...Ballard. It's on Leary, just west of 15th. I bought a number of items from Walt back in February: germination potting mix, grass seed, organic fertilizer, lime, and coir.

Walt's a very helpful guy. I went in with a rough sketch of my yard so we could figure out which products and how much of each I would need. It's a small place so he doesn't have a ton of stock and variety, but he's got a product for each category of need. Prices are probably a little higher than you might find other places but you're supporting the little guy and the quality is high. Walt only loses points for his limited hours. In the winter he's only open 10-4 on Saturdays. He's now added Tuesday-Friday, 10-6, but with my commute that does me no good. Otherwise, though, thumbs up for Walt's.

Let me explain why I bought the products I did, in case you're curious.

* germination potting mix - There many different types of soil one can buy--I don't really know the difference, to be honest. I gather that the makeup of a germination mix provides an easy path for young roots (isn't too clay-ey) and holds (or draws) moisture well.
* grass seed - We've got some bad spots in the yard. Our soil is probably too compacted in places. It's also dry and (probably) acidic under the pine tree. I raked out the accumulated needles to give grass a chance. We'll see how it goes.
* organic fertilizer - I haven't really made use of this yet. Walt makes his own mix out of things like ground shells and fish meal, or something. I should probably use some on the bad parts of the lawn and I'll probably want some in the flower beds once I get them planted. Interestingly, though, some of my seeds indicate that fertilizer makes the plant grow instead of flower and so you are encouraged to plant them in poor soil.
* lime - We get a lot of rain in the winter here in Seattle. This tends to leach the soil and leave it acidic. Lime reverses this trend. Some plants prefer acidic soil so (as I understand it) it's good to check your soil pH and correct accordingly. But testing acidity is a bit of a pain (you can use testing strips or electronic devices). I need to do it, though.
* coir - This one was new to me. Walt suggested I put coir over my grass seed when I planted it to help keep in moisture. Coir is a product derived from coconut husks and it's being marketed as a more sustainable alternative to peat. Peat, as you may know, takes many, many years to form. Coconuts, as you may also know, do not. This seems like a useful soil amendment and I'll try to use it when appropriate.

Having mentioned the idea of labels at the beginning of the post, I'm wanting to provide a label to indicate that this post has information concerning gardening techniques--that being the use of soil amendments. But nothing is striking me yet. You have any ideas on a category I could apply to posts such as this one? It doesn't fall in the category of seed starting. Hmmm... Leave a comment with your suggestion?

Saturday, April 7, 2007

Pictures of my seed starting setup

So I've finally got pictures!

Here's the seed starting table. It hangs from the ceiling by chains since the crawl space has an uneven floor. Here are some things to notice in the picture:
* The blue bin under the table is the reservoir for water. As mentioned in previous posts the automating watering system is currently nonfunctional. You can see the tubing traveling from each end of the tray and down to the reservoir.
* The fluorescent lights hang from pulleys (not visible). Normally the lights would hang 2-4 inches above the plants. Here I've raised the lamps so I have access to the flats.
* The watering tray is attached to the end of the table, with a capillary mat hanging into the tray and extending under the flats. There's a heating mat under the capillary mat.


Here you can see the capillary mat up close:


There's a second table nearby for doing potting. It's only a few steps away.


Here's the setup from the side, showing about 3 1/2 flats currently planted:


Here you can see some pot-paks. Often they come as a standard 10" x 20" set and you can't mix and match sizes. I got the kind you can split so I'd have more flexibility. I've got plant tags for each pot-pak and a thermometer to check the temperature. Finally, notice the wire running to the lower-left seed tray. This is the temperature probe for the heating mat's thermostat. The thermometer has confirmed for me that the thermostat is basically accurate.


Here's what the thermostat looks like:


The heating mat can raise the temperature 10-20 degrees. It's around 50-60 in the crawlspace, usually, so the mat is able to bring the temperature of the trays up to the recommended 70-75 degrees. Most seeds, once they germinate and are transplanted to 3" pots, prefer cooler temperatures again. This is the intended purpose of the 2' x 4' behind the trays. My plan is to have another capillary mat and another pair of lights. I've got the mat and the lights but haven't assembled them yet. Not necessary until I start transplanting.

Posted by Picasa

What I planted

Tuesday night (April 3) I planted my first flat of seeds and I promised to tell you what I planted. Last night I planted 3 more flats (I got faster with practice) so I'll list those as well.

Before I start I want to offer a disclaimer. I'll often use Latin names to indicate a given plant. Most of these names are new to me, so you know I'm not using them to show how smart I am. Rather, it's the only way to accurately describe most plants as the common names are often inaccurate or confusing. Often, for instance, two taxonomically unrelated plants may have similar names. Latin, then serves as a dependable way (generally) to find the same plant and/or information concerning said plant.

Following are the seeds I've planted. Note that links from the seed provider name (following the plant name) show the actual product from the vendor's web page. Links from the plant name are to other information on the plant.

Planted on April 3:
* Codonopsis Clematidea - Thompson & Morgan - medium height; perennial; pale blue, nodding, bell-shaped flowers
* Abutilon Hybridum, Flowering Maple - Livingston Seed Co. - has maple-like leaves but not at all related to the maple tree; flowers look something like uncompletely opened hibiscus
* Thunbergia Alata, Orange - Livingston Seed Co. -Black Eyed Susan Vine
* Gazania Splendens Hybrid, "Daybreak Tiger Stripes" - Livingston Seed Co. -Amazing striped daisy from South Africa

Planted on April 6:
* Lobelia, "White Lady" - Ed Hume Seeds -Pretty little long-blooming white flowers
* Mesembryanthemum Criniflorum, Livingstone Daisy - Ed Hume Seeds -fine-petaled multi-colored daisies
* Nasturtium, "Peach Melba Superior" - Livingston Seed Co. - Fascinating peach and maroon flower on light foliage
* Marigold, "Starfire Signet Mix" - Ed Hume Seeds - Small, multicolored bush marigold
* Cosmos, "Sensation Mix" - Burpee - Popular tall annual for the front of the property--pink, white, maroon
* Felicia Bergeriana - Thompson & Morgan - Pretty little blue daisies with bright yellow centers
* Cosmos, "Bright Lights" - Ed Hume Seeds -Shorter cosmos--orange, red, yellow
* Zinnia, "Cut and Come Again Mix" - Burpee - Double-bloom zinnias for cutting (hence the name)
* Impatiens, "Flavours Hybrid Mixed" - Burpee - Small shade plants with red, white and pink flowers

A word on flower names... The term "daisy" is used to describe a variety of different plants, also called Asters, all with a similar configuration--star shaped petals surrounding a central disc. To indicate a more restrictive sense of the term one would usually call a plant a "Common Daisy" or perhaps "English Daisy".

Well, there you have it. Will continue to update you on progress...

First seedling!


Before planting I sorted my seeds in reverse order by germination time. I knew I probably wouldn't get to plant everything at once, so I wanted to plant the seeds first that would take the longest to germinate. Even so, only two days after planting this seed (suggested germination time 10-15 days), I've got my first seedling! And the winner is my Gazania--a very cool striped daisy.

I'd been working on a post listing what I'd planted but I lost it. Will start over with the next post--there'll you'll find information on this plant and others.
Posted by Picasa

Wednesday, April 4, 2007

The setup, and what's wrong with watering

Finally!

Last night I planted my first flat of flowers. I had an hour or so to go downstairs and since the glue had dried sealing the leak of last week it was finally time to plant. Tragically, my watering system still has problems and until I figure out how to fix it I'll have to abandon automatic watering and try to keep on top of my plants' watering needs the old fashioned way.

Let me explain my seed starting setup, with pictures to come. I built a 4' x 4' table. On the table I've got a heat mat, with a thermostat, which heats up the flats to a temperature suited to germination (about 70 degrees). A flat, incidentally, is an industry standard--a 10" x 20" plastic tray, often used to hold compartmentalized seedling trays. I bought a bunch of the trays, with different numbers of compartments of varying size (see product picture for size comparison). On top of the heat mat, and under the seed trays, I've got a capillary mat, which uses osmosis to water the seed trays from below. I can't seem to find the exact mat I bought on the Charleys site. Mine came with a plastic sheet to go underneath (to keep water off the heat mat) and a fabric sheet to cover the capillary mat and keep errant plant roots from growing down into the mat.

I intended to provide water to the capillary mat from a piece of plastic rain gutter which I cut to size and capped on the ends. It's the caps that were leaking previously--all fixed now. I feed water to the gutter via a small water pump that pumps water from a plastic Rubbermaid-type tub under the table. The tube from the water pump connects to a small adapter I glued into one of the gutter end-caps. On the other end-cap there's another adapter with a tube that drains back into the tub. In this way the gutter can be kept full as long as the tub continues to have enough water to feed the pump. I figured every day or two I could dump a pitcher of water in and I'd be good.

The watering problem I had last week was that I had the gutter (about 4" high) setting on top of the table with the capillary mat end placed in such a way as to hang a few inches into the water in the gutter. While I had tested this arrangement successfully before I let it run a little longer this time and it quickly became clear that water was spilling off the mat and making a mess. My theory is this: The mat was effectively pulling water out of the tray--osmosis was working. But as the water moved out of the tray and dropped the 4" to the table it sucked more water behind it--a siphoning action. Osmosis + siphoning = too much water. The solution was to add brackets to the table to allow the gutter to sit at table height rather than above it. In this fashion siphoning wouldn't really work (siphoning requiring gravity and gravity requiring a height differential) and I'd be back to just osmosis. At this point I moved everything around and caused the leak in the end-cap so I fixed the leak, which brings us to last night.

Last night I discovered my drain wasn't reliable. My gutter filled with water as the little pump did its business. Sadly, though, while the drain could go for a good 20 minutes or so successfully I noticed on two occasions water spilling over the lip of the gutter. I had no choice but to flip off the pump, which meant my capillary mat no longer had a water supply. So what now, a bigger drain tube? I don't know yet. I just know I'm out of time and have to plant seeds. And that brings me to the next post, which will concern what I planted.

Sunday, April 1, 2007

Why the seeds aren't starting

When you start plants from seed, everything revolves around "last frost"--the date at your location after which it is unlikely to frost. Most tender little plants don't like frost so you don't subject them to it. In Seattle, April 15 is considered to be last frost. A seed packet with instructions for indoor planting will provide an indication of how long before last frost that seed type should be started, taking into account its germination time. This can be 2, 4, 8 weeks, or longer.

I'm now within 2 weeks of last frost and don't have any seeds started. My free time is a bit tough to come by, what with a 2-year old and an infant (and a wife--don't forget the wife). For lack of a better location I've had to prepare a spot under my house to do seed starting and it took a fair bit of research to discover and obtain the materials (not to mention the seeds) I'd need.

Every project I embark upon (not just in gardening) takes longer than I think it will. I don't apologize for my optimism (I think it's a great quality), but I do acknowledge it often turning out to indeed have been optimistic. Today I thought I'd be planting my first seeds, finally. I've got tables constructed and a watering/heating system and tons of seeds and everything else I need. Unfortunately final assembly this afternoon revealed a design flaw in my watering system and it made a mess. Rejiggering it caused a leak and now I've got to glue up some pieces and let them dry for 24 hours. Hopefully by tomorrow night we'll be in business.

Also, now that everything's constructed hopefully there will be more time to post updates. I've got to catch you up on the plan and what I've learned so far...